Recipe

Hollandaise Sauce

Here is the post implied by the ending of the recent herb steamed asparagus post, in which I finally tried making hollandaise sauce almost but not exactly as indicated in this recipe. I had bought two bunches of asparagus, and planned to do this with the second one, just because.

Weird, right? It doesn’t smack of frugality, and I have no reason to want hollandaise, having never, as far as I can recall, eaten it before in my life.

The thing is, the perceived difficulty of cooking eggs and keeping them liquid intrigued me. The idea of mother sauces intrigues me, especially since I rock at sauces and gravies generally. The presumed similarity to making homemade mayonnaise intrigues me.

Finally

, it’s part of the quest to make variants of plain old asparagus.

So. The recipe. I used 4 yolks, as it said. Most recipes I perused called for 3 yolks. My eggs were extra large, for what it’s worth, not large. I’ve had a goofy little egg separator for 30+ years and, as far as I can recall, have never used it. Until now! For one egg. Which told me doing it with my hands, as I have seen TV chefs do, was vastly better. The gadget was too small, and failed to separate the white as fully or quickly as my fingers. I saved the whites for another experiment, in a cake, since it was my birthday and I am the cook here.

I got about 3 tablespoons of juice from a lemon I had remembered to buy for the purpose, and used one for the hollandaise. See the aforementioned cake for the fate of the rest.

Now, every other recipe I looked at called either for (mostly) a tablespoon of water or (less often) a tablespoon of cream. Or maybe it was milk. This recipe had neither

, but I used water anyway, and good thing. I could see it being even better with cream or milk.

I used salted butter. I do not as a rule have unsalted in the house. I buy it if I plan something I know calls for it, and care enough to comply. Some recipes specify unsalted. Some do not. I melted it carefully in the microwave, managing to come out with a complete melt that was no more than room temperature. In just one place I saw mention that sometimes clarified butter is used in hollandaise. I thought that sounded right

, so as best I could, I mostly skimmed off the foamy milk solids. (If, like me until relatively recently, you have no idea what is meant by “clarified butter,” that’s all it is: melted butter with the light colored scum you see floating on top skimmed off. It sounds fancier and more intimidating than it is.)

The pinches of salt and cayenne were as directed, though I went very light on the salt, considering the salted butter.

The recipe describes the lemon juice and yolk mixture doubling in volume. I’m not sure mine doubled, though my dubiousness was mooted by seeing that it did increase in volume.

The method described for using a stainless steel pan with a saucepan is great as a makeshift double boiler. Granted, doing this made me pine for a double boiler, and I even found that there are pans sold that come with both steamer and double boiler insets. I checked, since logic suggested the possibility to me.

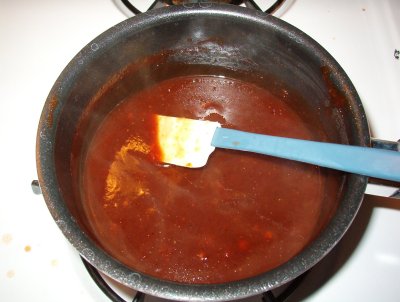
I would emphasize that pretty much continuous light whisking/stirring is imperative to keep the egg from cooking into solids. It has to cook as a liquid. When it was obviously done

, I set the metal bowl into another bowl with shallow, cool water in it. That arrested the cooking process. Shortly after, I changed the water for warm so the sauce wouldn’t get too cold.

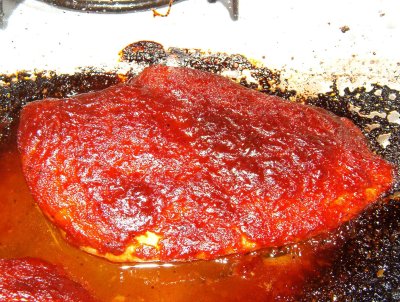
I steamed the asparagus with herbs, but less strongly than I had the first time. I thought the flavor would go well, even though the sauce would add flavor and a change of texture profile. That sounds all fancy.

The result?

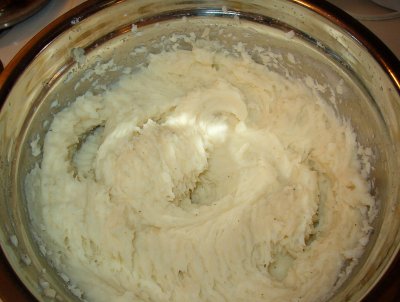
It was tasty, but too lemony for me. I can’t imagine it is meant to taste that lemony. It was a bit thicker than perhaps is ideal. And that’s with the water the recipe didn’t include! I could have put in a tiny bit more to thin it

, but didn’t bother. If I make it again, I would start by reducing the lemon. I would probably use milk or cream instead of water. I might experiment with seasoning the sauce. Heck, I’d be interested in using the basic technique for an eggy sauce to diverge into doing my own thing entirely.

Was it hard to make? No. I didn’t find it tricky at all. I can see how it could go terribly wrong, sure. But I had perceived the making of a sauce in which eggs are cooked liquid to be extremely difficult. Anyone paying adequate attention could do it. Now I know.

Baked Beans

In the past several weeks, I have twice experiemented with making baked beans. These are something we had homemade when I was a kid

Order Silagra

, but that I have never made. I started by looking at recipes.

I can’t take seriously any recipe that starts with canned pork & beans or even canned baked beans, notwithstanding that in younger, single days I made a darn good chili based on Campbell’s pork & beans. These days I focus on what I can make from inexpensive dry beans.

The first recipe I used came from a friend I first met in seventh grade, who turns out to be distantly related, as we are both Howland descendants. The identical recipe can be found online, as the classic Revolutionary War era savory Boston baked bean recipe. For my friend it is her mother’s Howland family recipe. I will distill it below, after I comment about it a little more.

The objective for me with baked beans is for them to be cheap. Tasty

Antidepressiva Paroxetin kaufen ohne Rezept

, too, of course, but the ingredients should not result in spending much for the amount of food obtained. Salt pork (bacon, in some recipes) was a huge surprise, and not frugal.

For my first attempt

Buy Prinivil Online without Prescription

, I did want to follow a recipe exactly, so I went looking for salt pork. I assumed this would be tough, having never noticed it in store. Nope. Walmart had it. Hannaford had it. Market Basket had it. Once I looked, there it was, large amounts. It came in small packs for something like $3.49 for 12 ounces. I pointedly bought navy beans, as they seem to be a favorite, though you can use whatever. My friend’s grandfather liked them with lima beans, which seems odd to me, to say the least. I like lima beans (she hates them), but have never had them dried and can’t picture them in baked beans.

I made a recipe-free attempt of my own a couple weeks ago, using pinto beans, no meat product at all, and substantially different everything else. I know this is going to run long, but bear with me and I’ll tell you what I learned from that adventure before the end.

Classic Howland Baked Beans

Soak 1 lb of dry beans over night in enough water to cover them generously. Par boil until fairly soft. Drain and rinse.

Put 1 large chopped onion and 1/4 pound salt pork in the bottom of a slow cooker or bean pot. Cover with the beans. Sprinkle beans with 1 teaspoon dry mustard

http://antolaphoto.com/allopurinol/index.html

, 1 tablespoon salt, and 3 tablespoons of brown sugar. Add 6 tablespoons of molasses, and boiling water to cover.

If you don’t want to soak beans overnight, it’s OK to use the quick soak method, but it is important to par boil the beans until tender and rinse them well. If they are not tender enough to start, the molasses will make them like marbles no matter how long you cook them.

Pea beans or navy beans may be used, or another variety if you prefer.

The traditional way of baking this recipe is in the oven all day, or over night at a low temperature. Use a covered bean pot. Remove the lid toward the end of the baking time to allow the top to brown and to evaporate some of the liquid.

I went a little heavy on the salt pork when I made this, using half, or 6 ounces, rather than 4 ounces. Just as well, since I did not find another use for the remaining salt pork before it needed to be tossed out, making for expensive beans. I used only part of a very large, sweet onion. I may have cooked the beans less soft before baking than I could have, but they were soft enough not be a problem. Then I promptly forgot that precaution, which does not seem to be included in other baked bean recipes, or in the responses on forums where people ask how to avoid their beans being too hard. Old beans? No.

We liked but didn’t love the result of the above recipe, but it had obvious potential. By “we” I do not mean the kids. I did like the salt pork in it, and would love to try that or bacon in the future, but in an otherwise modified recipe.

The next time I made baked beans, I experimented. I winged it, and used the pinto beans I already had on hand. Chili made with those is a staple here. We have it perhaps every two weeks. The exception was the time I tried making white chili, based on nothing more than a description of what my wife had had when visiting family in Oregon. For that I used dry cannellini beans, which had a great flavor and smooth texture. But I digress.

I can’t remember clearly what I used in the pinto batch of baked beans, but my objective was a sweeter flavor, albeit still centered around molasses. Which, incidentally, I also had to buy in order to make the first batch. For some reason, I had thought molasses was far more expensive than it turned out to be. It has the benefit of long shelf life. Not to mention one container of it covering a number of batches of beans or whatnot. Haven’t yet explored the whatnot angle.

The most important lesson of the pinto baked beans involved remembering to cook them soft before baking. They did indeed come out “like marbles.” It was edible

Ivermectin (Stromectol) kaufen Ohne Rezept Online In Schweiz

, but not the texture I want from my beans. It made up for it somewhat that the beans were so utterly imbued with flavor and transformed, but no more chewy beans for me.

I’m afraid I don’t remember the details. However, I used some onion, as with the other recipe, chopped small and layered bottom and middle. I used plenty of molasses, layers of brown sugar, plenty of dry mustard, salt, and a spritz of maple syrup. Not that spritz is the right word for something of that consistency

http://allfreethings.com/cefaclor/index.html

, but just a little, a couple drizzles. I may have used a touch of vinegar, too, and I might not have remembered that except for the hard bean issue. When I saw what had happened and was near the end of the cooking, I tried adding a wee bit of baking soda in case that would help. It naturally foamed up from the acidity. I had the anecdotal impression that it helped ever so slightly, but that could be illusory. At any rate, if it did, it wasn’t enough. I had forgotten the need for uncovering the beans at the end, but wound up doing so because there was too much liquid. That was an additional reason I kept cooking them longer than I had expected. Despite what the original recipe says, I found it didn’t need all day. Just a few hours.

Next I will try making them less sweet than the second experiment, but with beans cooked into submission ahead of time. They were delicious, and went fantastically with a burger or bread and butter, but less brown sugar would have improved them. If I can have some on hand anyway, perhaps from a sale, with the rest to be used for a different meal, I’d love to add some bacon.

I’ll try to remember to post about what I do and how it turns out.

Online health care medications

Sweet & Sour Kielbasa

Is this frugal? Maybe, or maybe not, but it is something I make regularly, much beloved by everyone in the house. It’s a rare meal that all three kids eat. I don’t have a recipe, but it’s straightforward. I was inspired by a dish of the same name by my sister, as more of a party appetizer, using whole berry cranberry sauce. Mine is more savory.

I put a tiny bit of water in a saucepan, and add a can of jellied cranberry sauce. Brand makes no difference, so I’m always delighted to get store brand for 99¢, or less in the case of an extended sale Hannaford had last fall. I like to use a small whisk to break it up, as the goal is to reduce it back to liquid. For a heavier batch, you can use a second can of cranberry. For thinner sauce, more water.

I add ample dry mustard (tablespoon?), some ginger and plenty of allspice. To be honest, between the flavor of cranberry sauce and kielbasa, I am not sure how much influence the seasoning even has. I think the mustard helps make it more savory, and I can tell the allspice is there. Ground cloves could probably sub for allspice, but I’d use less. They go well in homemade cranberry sauce, so it makes sense.

The other ingredient for the sauce is brown sugar. A lot of it. That’s the sweet. The cranberry without it is pretty tart. It also acts as a thickener, but too much would need to be balanced back out, if only by more mustard.

To the sauce I add pieces of kielbasa, thinly sliced coins, as much as I can manage. Cooked kielbasa! Obviously if you were starting from uncooked, you would want it to cook before saucing and finishing it off. I like the kielbasa to simmer on low heat in the sauce for long enough to darken and add its flavor to the sauce. How the sauce tastes before adding kielbasa is nothing like how it will taste, so use caution when you taste it before adding the meat and want to panic. The kielbasa, after a while, almost candies in the sauce.

I serve it over white rice. The beauty of this is you soak the rice with lots of sauce and put limited kielbasa on top, then the flavor is all in the rice and the rice becomes like eating meat. To add some kind of veggie, I normally have corn as a side. Tonight I also made butternut squash. I love this time of year! Butternut for 79¢ a pound yesterday.

I use Hillshire Farm kielbasa. One package, 14 oz, will do, but I generally use 1.5 to 2 packages worth. The beef kind can be used but has a different taste and texture. This has gotten rather high in price. Before Market Basket essentially shut down last year, it was routinely $2.99 and sales could be less. Once they opened, it was one of the things that was higher, be it because of supplier issues or needing to make up for the cost of being closed. Now a rare sale is $2.99, but they have large packs, equivalent to three regular ones, that are a much better buy. That makes it easier to make larger amounts.

Rice is cheap and overall it’s a reasonable, easy to stretch meal. It’s also quick and easy to make, and hard to mess up.

Eggless Tempura-Style Chicken

My brother recently mentioned having made tempura-style orange chicken, which led me to look online to find out what exactly tempura was, since I’d not to my knowledge had it before.

I learned that tempura is Portuguese-inspired Japanese, foods fried in a very thin batter coating. I recently tried a batter coating for strips of chicken and ended up replicating, except for having seasoned the batter, Chinese restaurant chicken fingers. The kids loved it, and I figured the batter was a way to stretch the limited amount of chicken.

Usually tempura is made with eggs, flour and cold water. The cold matters to the chemistry, much the way hot presumably mattered in my recent test of a faster flour tortilla recipe. The egg apparently doesn’t, because I found it is possible to make tempura without it.

I’ve learned that the best way to arrive at recipes or adaptable inspirations for dishes that contain no dairy and no eggs is to include “vegan” in the search. It seemed kind of odd to search for vegan tempura, but in addition to its most common use in seafood, tempura is also used for vegetables, which I look forward to trying. I’ve had that kind of thing in a restaurant, if not by that name, with cauliflower, squash and broccoli.

Here is what I did…

2 Cups flour (Too much, for 3 chicken breasts, could halve it or use more chicken, or whatever you’re using this on.)

2 Cups cold water (I put ice cubes in it ahead of time.)

2 Heaping teaspoons baking powder

1 Teaspoon or so of salt

A little oil – maybe a tablespoon or so.

Season as desired or not at all. I used a bit of red pepper, a dash or so of garlic powder, and a bit of black pepper.

I deiviated from strictly tempura by crumbling some Ritz crackers fairly fine and dipping one side of most of the pieces of chicken in it. I also considered using oatmeal similarly.

No deep fryer here. Enough oil in a frying pan, nice and hot, to be able to cook one side then turn it over.

I cut the chicken into very small strips and chunks, the better to cook fast and go with the lightness of the batter.

I put the dry ingredients in a bowl and mixed them together with a whisk. Then I poured in the water and oil. Started with half the water and mixed, then the rest. You might watch how it seems and back off or add to the amount of water. Stirred it thoroughly. It bubbled a little and looked a lot like pancake batter. I ended up just drowning all the pieces of chicken in the batter, pulling each one out and putting them in the pan one at a time in two batches. I ended up frying a small patty of batter and crumbs from the batter that was left on the crumb plate. That was yummy and suggests possibilities.

This is very much a keeper. We inhaled it. On one of the recipes I saw for vegetable tempura, it said serve and eat immediately lest the batter get soggy. With the chicken I’d also say eat it sooner than later, because it isn’t as good in texture after it sits a while. Tastes good though. The vegetable tempura recipe also said dredge in flour before dipping in batter. I can see that being useful for veggies. Chicken worked without. Would it have worked better with? Not sure.

Since I have never had tempura in a restaurant, and in fact the only Japanese restaurant food I’ve had is noodles, I can’t compare. Even if it’s not “real tempura,” it’s so good I can’t wait ti try it again.

Flour Tortillas Without the Wait? (Updated)

I’m thinking about making flour tortillas and went back to look at the recipe with a critical eye, thinking there was a wait time involved. Sure enough, it was 3:00 when I started looking it up, and from kneaded it calls for at least 3 hours on the counter before forming into balls, rolling and cooking. I thought I might do it anyway, being at a loss for what to make if not burritos, but decided to look up other recipes to see if the wait is a universal.

It’s not.

I found this great video, which if nothing else shows good rolling technique:

For a moment I thought she was going to say put the little balls in the fridge, or let them sit out, but nope… immediate gratification.

What is fascinating about this video and at least one written recipe I saw is that they call for baking powder. Our recipe does not. I have to wonder if that makes the difference.

Maybe, but what it definitely does is make the tortillas in the video puff up like balloons, shades of what a pita recipe is supposed to do in a high temperature oven and with a thicker form of flatbread. (Flatbread variants fascinate me, and it’s logical that they were invented in various overlapping forms in various cultures and regions.)

At any rate, great, fast video, different technique than you’ve seen here in our traditional recipe and method. My burrito plans would appear to be saved. It’s at least worth a try, to see how they come out. Perhaps I’ll update later with results.

Update:

They were easy to make and it worked basically as advertised.  It was convenient, doing them so quickly.  It made about 16 smallish tortillas and only 2 remain.  However…. They don’t taste nearly as good as the recipe that leaves out the baking powder but has a 3 hour rest time.  I’d love to come up with a happy medium, where they are faster and easy to work with – these seemed to roll out better, though weather conditions favored it – while also being as tasty.

Revisiting Mama Jedi’s Flour Tortillas

Once upon a time, Deb posted her mother’s flour tortilla recipe at our former joint/family/anything blog, Accidental Verbosity, before moving to Blogblivion. We eat these fairly regularly, and once etsimated the cost for perhaps 16 of them at under 40 cents, versus, say, $1.69 for a pack of 8 commercial ones. You pay to save time and effort and get uniformity, but even Manny’s brand isn’t as good as homemade. It probably costs more now, given the recent increases in grocery costs and particularly, we just noticed on having to replace an empty, Crisco. That resulted in buying store brand soy/cottonseed shortening comparable to the current Crisco formulation. Traditionally one would use lard, which Deb almost got me as it was available and inexpensive. Definitely have to try that sometime.

This is a repost and, because it wasn’t written by me, guest recipe, inspired because I recently started making these myself, and found that the recipe was harder to find searching than it ought have been. I realized I’d started a food and cooking blog but never posted this here. Duh.

This was something Deb knew how to do inside out and I deferred to her, as one of her specialties. I’ll comment further at the end, but here is her original text:

Mama Jedi’s Flour Tortillas

We’ve been experimenting with different things to do with flour tortillas ever since we finally got around to trying my mother’s recipe for them. She used to make these often when I was a kid, since they’re better and cheaper than store-bought (and, I believe, because at the time it was tough to get even a passable grocery-store tortilla in rural Minnesota, a situation that has since changed). She taught some of the other women in the neighborhood how to make them, too, and they’ve been a hit with all who have tried them.

Mama Jedi’s Flour Tortillas

4 cups flour
1/2 cup shortening, in small cubes
1 & 1/4 cups warm water
1 & 1/2 teaspoons salt

Dissolve salt in water and set aside. Rub shortening into flour with fingertips. (I’ve got the warehouse-club-sized can of shortening, so I meaure it into a cup then divide it as I add it to the flour…instead of a single lump, little spoonfuls. Works just as well…the point is to have it in small pieces so it’s easier to rub into the flour.) Gradually add salt water to flour mixture. (The trick here is getting the flour/water ratio right so the dough is smooth rather than sticky or flour-y. I always seem to need a tablespoon more water or flour to make it just right, depending on how perfectly I’ve measured and the weather that day.) Knead well. Set aside covered for a minimum of three hours (I wrap it in plastic wrap

, to keep the dough from getting a “skin,” then toss it back in the bowl and cover with a towel.). Knead again. Divide into 1 & 1/2 inch portions and roll out on floured board. (I shape the dough into a cylinder, then cut off the appropriate portion for the size I want for each tortilla. Usually takes me a test tortilla or two to get it right. The best part of that is that the mistakes are so tasty…yum. I also roll them out right on my countertop…a board is certainly not required, unless you have tile. *grin* The dough should be good and stretchy and a bit of a pain to roll out, and tends to shrink slightly when transferred to the pan, so roll ‘em thin.) Cook each on a hot griddle/frying pan until it bubbles and browns slightly. Makes anywhere from 12 to 18 tortillas, depending on size, thickness, and how many get eaten along the way.

As for what we’ve done with them…we’ve made burritos and quesadillas and even chicken and veggie wraps in the last couple of weeks, and I have no doubt some of the turkey will find it’s way into them in one form or another. Very versatile and very, very yummy.

The first time I made these, I became the official tortilla maker, they came out so well. The directions above say knead again after the dough sits at least three hours. Turns out that Deb didn’t actually do that when she made them. I did it minimally at best. It doesn’t seem to hurt them and anecdotally may be better, though certainly if the dough needs a little extra to get the texture feeling better while making it into cylinders.

I use one of those Pyrex cups that has lines up to a cup but room to add an extra quarter cup by eye. I microwave cold water a minute or 90 seconds, stir in the half tablespoon of salt to dissolve, and set it aside. I’ve been using about a cup in practice.

I make sure the flour is worked into the shortening extremely thoroughly. It’s somewhat like making pie crust, but without the objective of flaky.

I flip them over and over while rolling, to hel combat the curling and get them thin enough.

Basically it’s an easy easy thing to make. The big consideration is the sitting time for the dough. It’s fast compared to making bread. It’s even relatively fast to roll out, and I roll a couple then start cooking as I roll more.

They are so useful and so cheap. We’ve had the challenge of a baby with food sensitivities that seem to be based around salicyslates, and these were a perfect introduction to wheat-based foods, which as expected don’t bother him. Being simple and homemade, I knew exactly what was in them. Not like, for instance, whoile wheat pasta that contains corn meal, which he can’t have. But I digress.

Enjoy!

Chicken Melt

Simple yet tasty. At lunch yesterday I had the kids by myself, so I thought about giving them tuna, despite Sadie’s “no!” when asked. That made me think of tuna melts to be different, especially given the presence of a chunk of sharp cheddar – almost too sharp – that the kids seem to love.

Then I remembered a boneless chicken breast with sweet barbecue sauce I had leftover from the oven a couple days ago.

I sliced that thin, across the grain, and laid it out on two slices of bread in the toaster oven tray. I topped it with large crumbs of sharp cheddar, not covering it completely, as with slices or a coherent layer of shredded cheese, though YMMV.

In it went for a top brown cycle. With tuna I’d often do part of a second top brown cycle to make the cheese especially melty and bubbly, but for the chicken that was enough.

It was delicious. A shame the kids weren’t enthusiastic, distracted instead by the Terra vegetable chips I noticed we had and served with it. Speaking of unexpectedly tasty things that perhaps shouldn’t work, but do. Sadie wouldn’t eat hers but guarded it with her life. I ate half of Valerie’s, and she did eat most of the rest.

Anyway, it turned out to be a cool thing to do with leftover chicken.

Barley Beef Stew

This is a repost from Blogblivion, posted here back in November. A few days ago, after an extended break, I made beef stew again, using my big stock pot and about 2 1/3 lbs of $1.59 “London broil” steak cut up small.

I started with a hunk of butter, melted in the bottom of the pot, with the majority of a large, sweet onion chopped and sauteed in it, starting to add seasoning, especially a mess of celery flakes. Then I added the meat and cooked it most of the way through, stirring in more seasoning. Ultimately the main thing was you could really taste the beef and peas, and a bit too much black pepper, but we ate it for four meals. The enthusiastic reception was a combo of it was especially good, the right weather, and completely unexpected. I didn’t have any real garlic, so just used some powder. I was limited in frozen veggies, so it got a lot of peas and some traditional frozen mixed veggies to add variety. It could be enough to have the potato, barley, carrot and onion, but adding at least the peas really adds something.

Okay, the rest of this is the original post:

Yesterday I made what we have dubbed barley beef stew, based on a recipe for beef & vegetable barley soup on the Goya barley package. I had a pound or so of top round steak in the freezer, left from a 2 piece, 2.44 lb package I bought recently for an astonishing $1.89/lb.

Their recipe calls for beef, barley, onion, garlic, spices, boullion, water, and a can of mixed vegetables.

We wanted something thicker, and would be using frozen or fresh vegetables, but I par-cooked the fresh ones based on the idea that precooked would go into the recipe as written. I could probably have just put the fresh veggies in right after adding the water.

So it went something like this…

Olive oil – tbsp or so
Beef, a pound or so, cut in small, vaguely cube-like pieces
Small onion or equivalent; I used 1/3 of a largish sweet onion
Garlic, 1 clove, minced; was small and I could have used two
Oregano, 2 tsp
Celery salt, probably about 1/4 tsp; not in original, subbed for not having celery or celery seed, either of which I’d have used instead if I’d had them
Beef boullion cubes, 2
Water, 4-5 cups; original was 4, I had to add a good cup more
Bay leaf, 1; I used crushed equivalent of 1+

, a little too much
Barley, 1/2 cup dry uncooked
Potatoes, 2 small to medium size, peeled and cubed
Carrots, 2 medium to large, peeled and sliced; I cut the largest slices in half
Lima beans, frozen, maybe a cup
Peas, frozen, maybe a cup
Other spices to taste, in pinches or more, including but not limited to black pepper, red pepper, cumin, savory, parsley, fennel seed.
(Corn, green beans, or mixed might work as well. We had no corn or it would have been in there.)

ObCTG: Remove lens cap.

Heat the oil in a saucepan and brown the beef. For me it was more of a medium pan, too deep to really brown and just cooked and bled water, which I boiled off as much of as I could.

Stir in onion and garlic and cook until onion tenderizes.

Stir in oregano, bay leaf, celery salt or seed, boullion cubes and water. Other spices can go now, later or both.

Bring to boil, then reduce heat and simmer. Original called for an hour, but I cut it short by at least 10 minutes. I put in part of the carrot and potato at start of simmer and the rest maybe half an hour in. I’d probably not par cook them next time and put them in at or near the start.

Add barley and frozen (or canned or precooked) vegetables.

Cook over medium to low heat another 30 minutes.

It was right before or during the last step I added black pepper, about 3 fennel seeds, and a dash of extra oregano.

Anyway, it was the tastiest beef stew or soup I have ever had. I started tasting the beef when it was first fully cooked and it was divine. It reminded me of my late grandfather’s beef stew when it was “on,” maybe a little more flavored. My grandmother is a great cook, but beef stew was one of his specialties. It actually got weaker later on, which, along with thinking it had too much bay leaf flavor, was what inspired me to touch up the flavorings. I also had to add water when I added the barley and frozen veggies. I should note that the barley could have gone in sooner, and actually finished absorbing water and cooking after the heat was off, as it was quite a while before we ate more than a sampling.

Deb said I’d outdone myself, and has claimed the lefover bowl of it for Mars herself. It made four solid bowls worth, and we estimated it at IIRC about 440 calories each, loaded with nutrients and fiber.

Pictures? Why yes, we have them.

This is after I’d added the veggies, barley and more water. In the first one it looks deceptively watery, but the second one shows just how thick it was in the pan.

The picture below is the leftovers, showing how thick it became after the barley finished. I thought it would be perfect to serve on and with injera (which even if I never try making an Ethiopian dish, I have a reason to try making now). We had wheat bread and butter, which is more traditional. Sadie was being bird-like, but Valerie couldn’t get enough of it.

Zucchini Fritters

I partially answered my own squash question, finding a ton of zucchini recipes online.

So when I turned off the computer in deference to thunderstorms yesterday afternoon, I started experimenting ahead of when I would otherwise have started making supper. I decided to try making zucchini fritters, using two of the five at the linked page.

I didn’t use any of these recipes, but I was intrigued by the pancakes, faux crab cakes, and Lucky Olive’s Zucchini ideas there. I don’t have any Old Bay seasoning, nor having I smelled or tasted it to my knowledge, so I’d have to wing it, combining the seasonings that are, in some proportion, a part of Old Bay. Which already sounds like something I’d come up with, except I seldom use the dry mustard in anything but Laurie’s Spicy Chicken (which I may as well repost here, if Google is going to have such an insanely hard time locating the post).

I also thought zucchini enchiladas sounded intriguing, though it intrigued me as much that it didn’t call for canned enchilada sauce, and could presumably be adapted to chicken, or a mix of chicken and veggie.

Anyway, I was mainly focused on the 4th fritter recipe, but I was intrigued by the 2nd one, as anything that calls for mint is so rare in my experience.

Here is the first recipe I used, as written, with points of concern in red:

3 cups of coarsely grated zucchini
2 large eggs, beaten
2 tablespoons of milk
2 teaspoons of all purpose flour
1 tablespoon of chopped fresh mint or
1 teaspoon of dried mint leaves

Place zucchini in colander; let drain 1 hour. In a large bowl, with a wire whisk, beat the eggs until they’re frothy. Add remaining ingredients; whisk until blended. Stir in the zucchini, 1/2 teaspoon salt and 1/4 teaspoon freshly ground pepper. Preheat oven to 200ºF. In large skillet, over medium to high heat, heat 2 tablespoons salad oil. Spoon in fritters batter, using 1 tablespoon butter for each fritter, adding more oil as necessary. Cook 1 minute on each side, until golden brown. Keep warm, covered with aluminum foil, on platter in oven until ready to serve. Makes 6 servings.

First annotation, the flour; this seems to be too little. My proportions were off because I used one cup of zucchini but used a whole rather large egg, but if you compare to the later recipe, the minimalist amount of flour makes little sense. They came out almost custardy, with kind of a soggy texture. The mint flavor went poorly. It would be better simply to steam, boil, even roast or bake zucchini with mint.

I grated one zucchini, resulting in 3 1/3 cups to use. As noted, I decided to use a cup for the mint variant, interpreting 2+ cups as about right for the garlic, oregano and parm variant. Though in reality what I grated was little more than a medium zucchini, so you could interpret the second recipe as saying to use five or six cups.

The grated zucchini went into a colander that nested into a bowl so it could shed liquid, and I mixed in a fair amount of salt to aid that process, letting it sit quite a while.

Anyway, I beat an egg, added and beat in maybe a tablespoon of milk, a teaspoon of flour, a couple dashes of black pepper, and near half a teaspoon of dried mint. Flour by the teaspoon? Still sounds weird to me. Then I mixed in the zucchini thoroughly.

I used olive oil for frying; not very deep. One lesson is they could have used more oil. That second annotation I realized, after momentary confusion, that it was a typo of batter. It’s not saying to add a tablespoon of butter for each fritter.

The modified recipe made four, nice and neat. They were thinner and runnier than the later ones, and I was surprised while they were still cooking as they seemed hesitant to get crispy. Getting Deb to eat zucchini is mainly about texture. That they came out like custard was no help, given that she disliked custard due to its texture.

You could eat them and live, but they were weird. I snacked down about one and a half, including a small piece I gave Sadie that sadly made her uninterested in trying the other kind later. She made a face and discarded it.

Not recommended. But I’d still love some ideas on what to make using mint, since I have a jar of it on the spice rack.

Here’s the recipe as written for the other fritter variety I tried:

2 medium zucchini, unpeeled & shredded
1 cup of flour
2 beaten eggs
Salt to taste
Pepper to taste
1 teaspoon of oregano
1 clove minced garlic
1/4 cup of water
1/4 cup of Parmesan cheese

Combine and mix all ingredients. Mixture will be the consistency of pancake batter. Drop by tablespoonfuls into hot oil and fry until golden brown. Drain on paper towels.

I had two cups and a fraction of shredded zucchini, as mentioned, and I decided to treat that as the quantity correct for the recipe. Who’s to say what “medium” means, after all.
, except it was Parmesan and Romano, rather than straight parm, and I used a little extra, and the clove of garlic was fairly large. I also added a dribble of extra water when I couldn’t even mix the batter, it was so thick. I scoffed at the “consistency of pancake batter” part, but it was, for relatively thick values of pancake batter. The moisture in the zucchini saw to that.

I made the oil deeper for these, and they tended to be thicker. Used slightly higher heat and made sure they were cooked as crisp as could be expected.

Deb liked it.

Valerie ate three of the twelve the recipe made. Sadie didn’t try them.

I thought they were tasty, maybe a bit strong on the garlic, but strong as it was, the oregano flavor shone through too.

We ate all twelve before and during dinner, despite having chicken, rice, summer squash and lima beans too.

I cooked the chicken in the same oil, figuring the flavor infused from the fritters would be a good base. I added a touch of garlic powder, red pepper, generous paprika, dash of ginger, celery salt, pinch of oregano, and some Italian seasoning. It was one of the tastiest batches of random chicken I’ve ever made.

I keep forgetting; I have pictures.

Plate of food for one of the kids, including part of a fritter:

Shredded zucchini, ready for its closeup:

Mint zucchini fritters:

Garlic oregano parmesan zucchini fritters:

Laurie’s Chicken: Making It Measured

This is a repost of Laurie’s Chicken: Making It Measured from retired blog Accidental Verbosity. I’d have eventually reposted it anyway, but when I went searching for it today I found that Google had changed something about how AV is indexed or ranked that made traffic there plummet a couple weeks ago from just about 300 a day to under 100. Whatever that change was, it made this post not findable at all by title or most of the logical sets of keywords. I should probably start reposting systematically, but this is one of my favorites…

My stepsister used to make a hot red sauce baked on top of chicken breasts, usually as a treat for her less kitchen comfy cousin, and once for me when we were both at my father’s house in Vermont. It was so good, I always remembered it fondly and wanted the recipe.

My stepmother recently asked her about it, and here is the “recipe” as I received it:

1/3 cup ketchup, 1 TBLS W’shire Sauce, black and cayenne pepper to taste, dry mustard, Brown sugar (she said she sometimes used twin B. sugar) and a little apple cider vinegar. Says these are all the ingredients which as you can see its by taste. Cook until slightly reduced. I would think you could dble this as it does [not] make very much.

So I decided to attempt to measure and create a more detailed recipe

, based on guesses and adjustments to quantities the first time I made it. Here is what I wrote up as a result, followed by pictures during and after. It is all quite adjustable, but if you like hot and don’t like lack of measurements to guide you, this works:

Laurie’s Chicken Recipe

This would work for 3 breasts, or heavy on 2 breasts. This is extremely hot as measured here, and could be done lighter on both kinds of pepper to soften the impact. Everything is somewhat flexible, beyond that, to taste.

1/2 cup ketchup
1.5 tablespoons Worcestershire sauce
1/4 teaspoon black pepper
1/2 teaspoon red cayenne pepper
1/4 teaspoon dry mustard
3 tablespoons brown sugar
1 tablespoon apple cider vinegar
2 tablespoons or so water, optional
boneless chicken breasts (2 or 3, adjust recipe to make more)
2 – 3 tablespoons butter, optional

Combine the spices, ketchup, worcestershire, brown sugar, and vinegar. I ended up using water to help flush as much as possible out of the measuring cup I mixed it all in, when transferring to a small saucepan. It gets cooked down either way. I was tasting as I went along, adding brown sugar after it was in the pan. Stir regularly while cooking over low heat.

Preheat oven. I would estimate 400 degrees throughout to be appropriate, though I started at 450. I put butter in an appropriately sized Pyrex pan and let it melt in the bottom before taking the pan back out. This was on the theory I needed something greasing the pan, and everything is better with butter. It would probably work fine with spray or even nothing.

Place the chicken in the baking pan. Cover top of each piece more or less evenly with sauce. Bake until done, perhaps 25 – 30 minutes at 400.

Here’s the sauce on the stove while cooking down:

Here’s the chicken after I put the sauce on, before baking:

Here’s a finished chicken breast:

I don’t know how, but Deb makes arguably the best mashed potatoes I have ever had. Normally I’m more of a baked guy. Some might even say I’m half-baked. Anyway, neither here nor there with respect to the recipe above, this is what Deb made to go perfectly with the hot chicken:

It was amazingly good; a bit on the hot side for Deb, perfect to bordering on excessive for me.